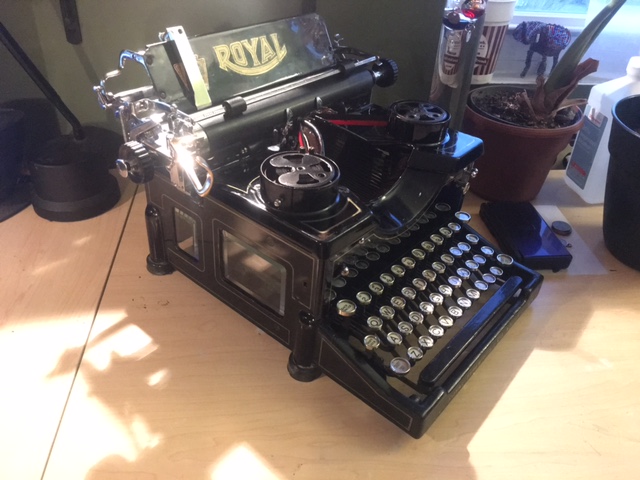
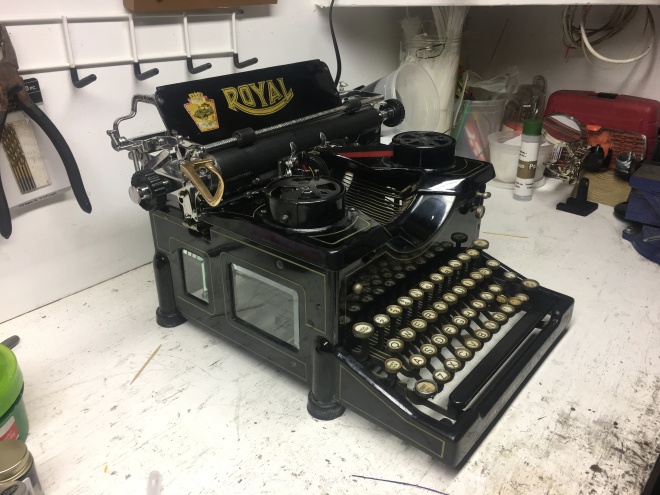
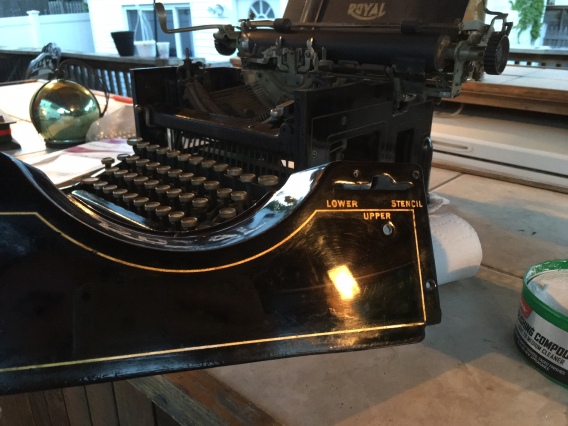
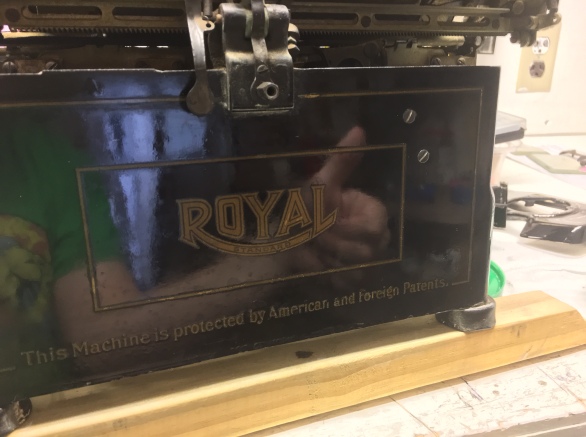
Finally going to post this guy on TWDB, so I took a few glamour shots. It still needs a bit of work, and I may take a few more pictures when the lighting isn’t total crap, but for now here are some pictures of a very shiny 1916 Royal #10. If there’s ever a type-in in the NJ area I’ll haul it along.
Mr. Royal’s long exile in the shed is over! He has been allowed to stay in the house as long as he remains on good behavior. Another incident like last time though and my justice will be swift and merciless.
Oh great, another mouth to feed.
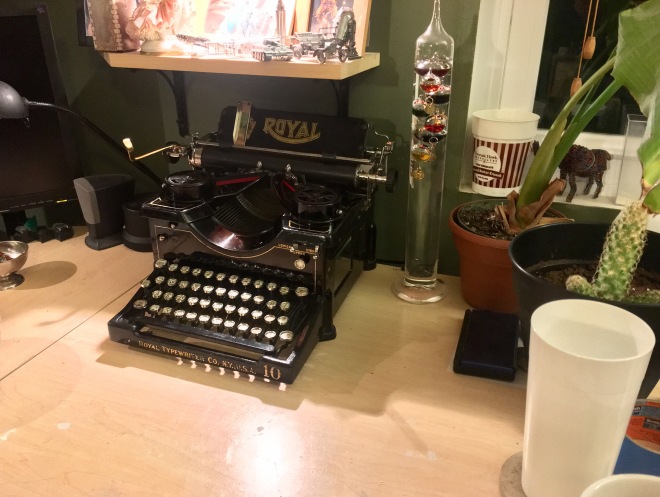
No, actually all the messy stuff is finally done so I can finish the last few things in blissful climate-controlled leisure. And I was getting really tired of having my nasty abused workbench as a backdrop for all of the pictures.
It fits right in on my desk, looking stunningly out of place between the computer screen and 3D printer. But it’s really the screen and printer that look out of place, compared to the timeless style and effortless grace of a fine piece of typing machinery. The Royal will still be in perfect typing condition in another hundred years with just a little periodic oil and dusting, while the others will have long been recycled and vanished without a trace, utterly forgotten.
If you find yourself in possession of a typewriter that’s so corroded and rusted and full of gunk it’s hard to tell what brand it may have been, sometimes you gotta get a little creative. But sometimes the sheer nastiness works in your favor.
Ewwwww.
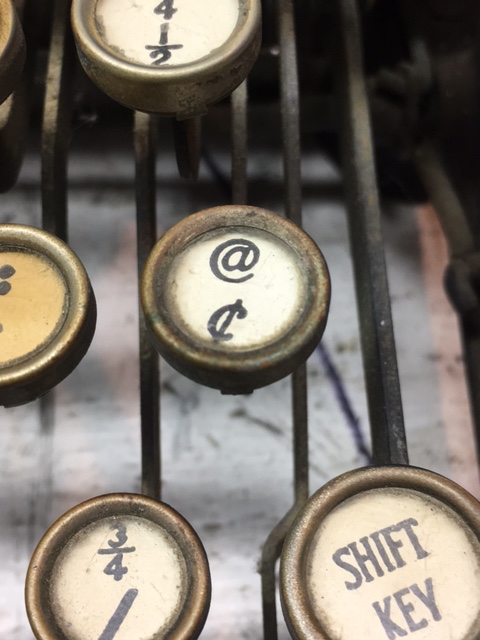
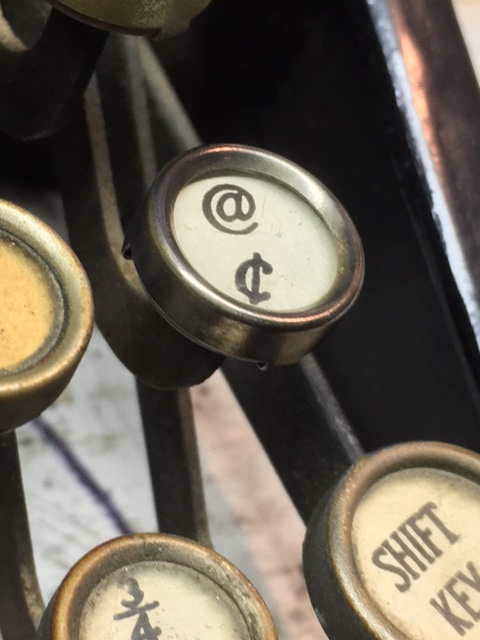
Case in point, the keyboard on this damn Royal. For those of you who haven’t been following, it’s a 1916 Royal #10 which I have been obsessively restoring off and on for a few months. I finally got around to the keys, but the nickel plating is in such awful shape that a stiff wire-brushing with a Dremel is the bare minimum required to get them shiny again. However, this is a terrible idea: glass keys do not appreciate the violent attention of a bunch of metal wires spinning at high speeds. One inadvertent twitch and you’ve gouged permanent scratches in century-old glass. Not exactly a recipe for success.
Unless, of course, the keys are so completely caked in filth that they can take a few hits with a Dremel before getting down to the actual glass. The sheer disgustingness of this typewriter is its salvation: I don’t have to laboriously unclamp the key rings, refinish them, and reassemble (a project which would take weeks and much cursing) because I can wire-brush them with impunity. Any Dremel slippage will just take off a bit of the caked-on nicotine/skin cells/et cetera.
Yes, this is the same key.
This machine’s horribleness is its salvation. It’s still a laborious, one-key-at-a-time, why-the-heck-would-anyone-do-this sort of process, but at the end I will have a typewriter with a shiny fresh keyboard and it will have taken an order of magnitude less time than if the keys had been slightly less nasty to start with.
Please don’t try this at home, kids – unless your typewriter is as filthy as this one. I’ve got a century’s worth of skin oil and tar and neglect protecting these keys but that’s not likely to be the case for too many others. Most that get this far down that particular road get tossed in the garbage. Which is a shame because there’s a perfectly good machine under all that, waiting for its chance to be useful again.
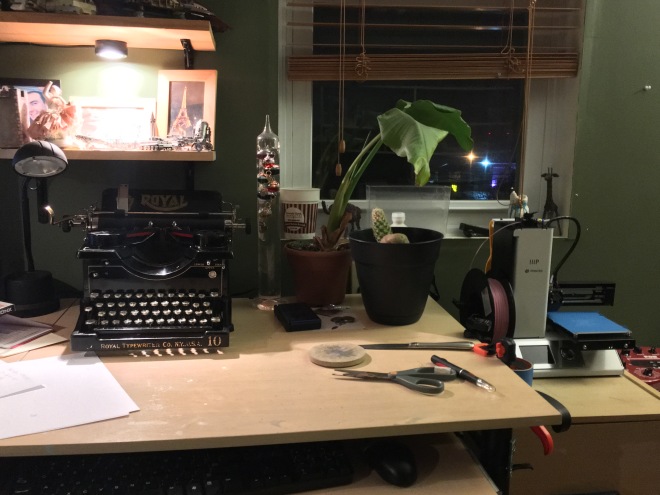
Trying to get the outdoors-required stuff done before cold weather really sets in: sanding, rust removal, paint work, polishing, et cetera. It’s not very glamorous or photogenic so I haven’t been posting much, but things are happening. The goal is to be able to move the Royal indoors so I can finish it up in comfort over the winter.
Lest you think I’m some kind of typewriter-abusing maniac, I work on things out in my shed. It has a roof and protection from the elements but only a tiny space heater for warmth. Not a problem for most of the year, but winter overwhelms the poor thing so it’s either bring my hobbies inside or let them sit until spring. So here I sit, frantically sanding down the final few pieces of metal that need refinishing while the temperature drops outside. Living on the edge, that’s me.
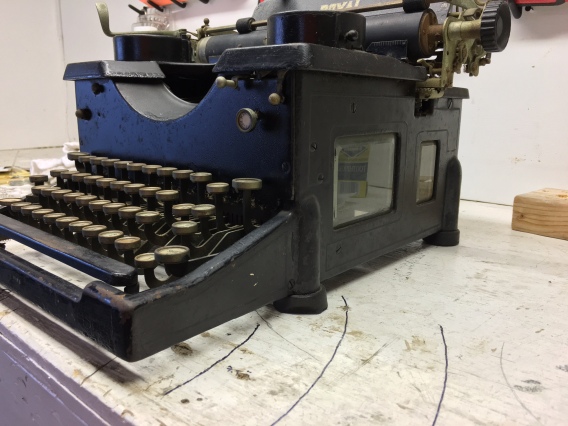
Here’s a quick shot of the Royal as it stands today. The keyboard remains a mess, the other side still needs re-pinstriping, and some of the parts you can’t see are sitting in a rust bath – but it looks pretty good from this angle. Types wonderfully too.
Sadly the Varityper will probably have to wait until spring, mainly because I have absolutely nowhere to work on that behemoth inside the house. I think it has its own postal code. Send fan mail to Varityper, PO Box 001, Varityper NJ. It’ll get there, believe me.
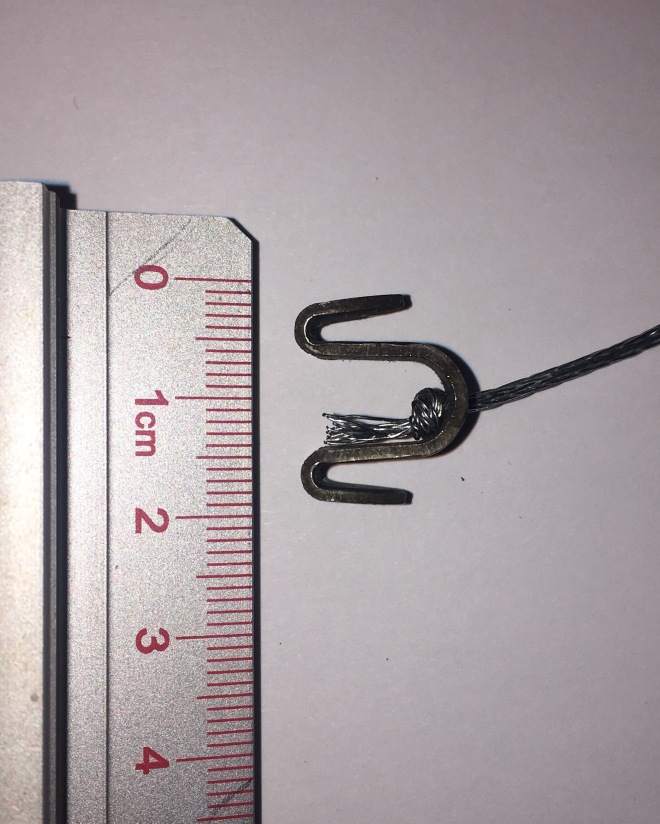
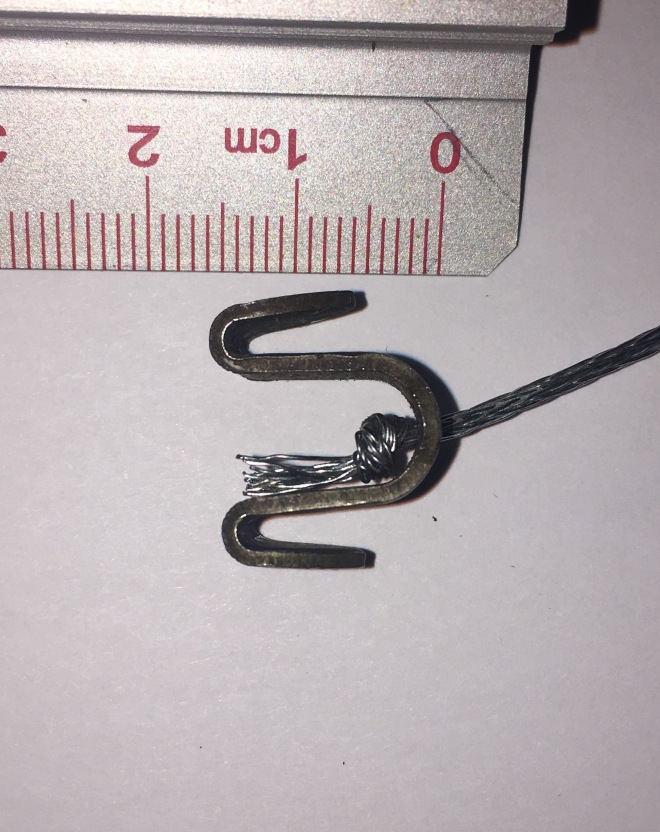
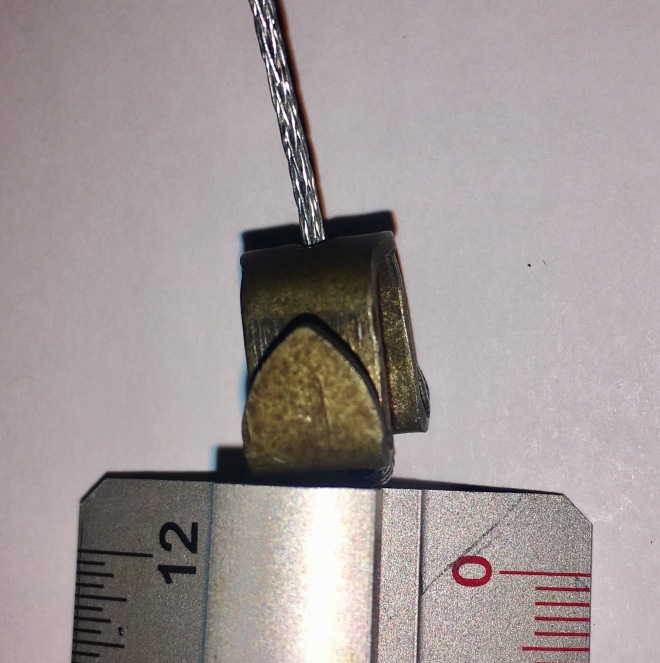
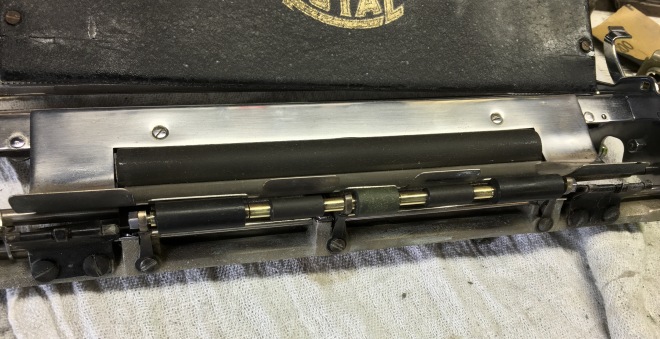
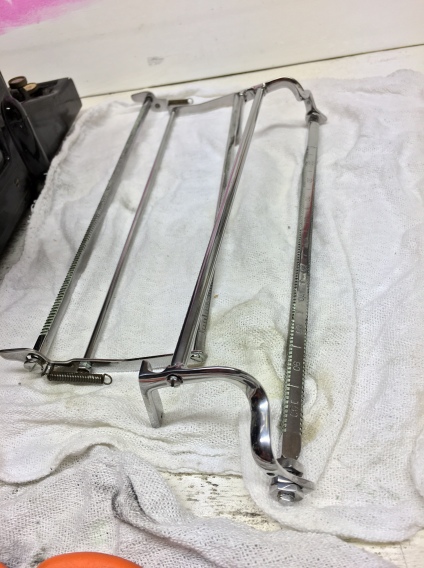
This is mostly just a quick post to get some info out there that apparently isn’t available anywhere else. Life has been totally nuts lately so the blog-posting has taken a backseat to Real Life ™. But after helping someone out with details on the Oliver’s unique drawband carriage clip thingy, I did some Googling and realized that there really isn’t anything on the Internet about how to make one for yourself.
There are YouTube videos, sure, but apparently nobody has taken the time to put up some close-up pictures and measurements of the damn thing. So I dissected my typewriter and snapped a few lousy pictures of what must be one of the few original Oliver drawband clips left on Earth.
Here you go, Internet. Hope these help in your quest to get your Oliver working again. Feel free to repost / steal / et cetera, and/or go ahead and drop me a line if you need any more pics or information. Even if it’s like five years in THE FUTURE ™ I most likely still have the thing and am probably still hammering out random notes to random people on it. Hell, want a random note of your own? I will totally do that.
(Offer not valid if the Post Office ceases to exist, Panama conquers the USA, or in the case of general worldwide floods/famine/breakdown of global society.)
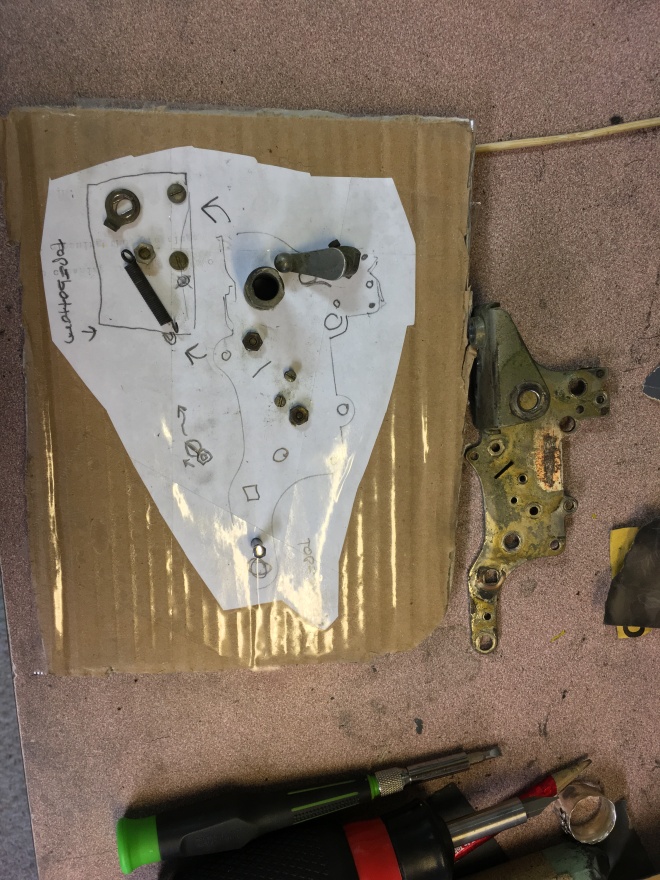
what do you do when you have to take like twenty tiny parts off of a big part so you can clean the big part, but are absolutely certain they’ll never make it back into the right places afterwards?
Not pictured: juice box and carrot sticks.
You bust out your grade school art skills and trace the Big Part, of course. In this case it’s the left-hand carriage plate of Mr. Royal, which you can see next to my sad artwork and perhaps understand why I needed to get at it. Yeah.
Anyway, then you tape your drawing to some cardboard and screw the tiny pieces into it wherever they belong. Bam, problem solved! If only I had some macaroni and white glue this thing would be perfect.
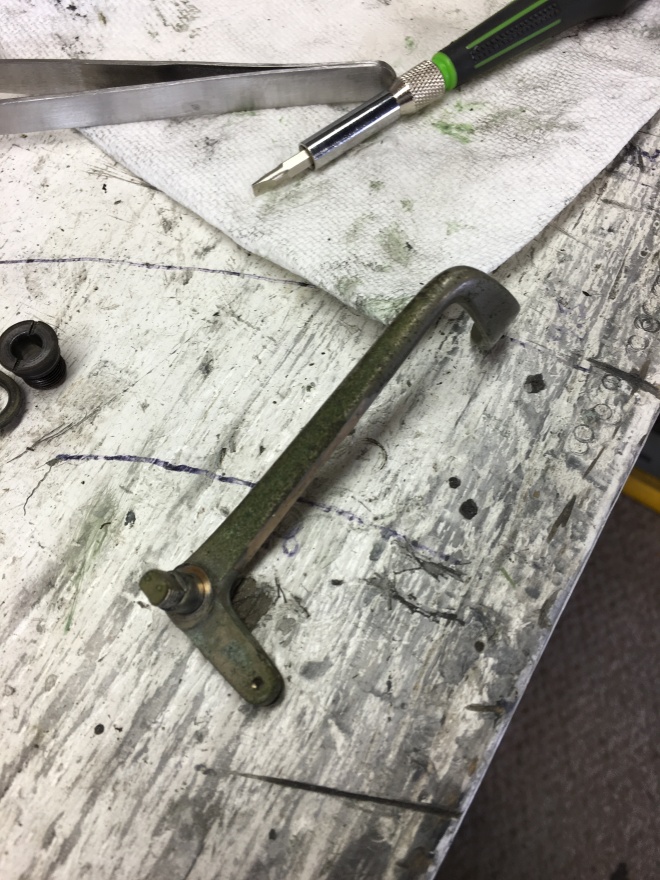
And in the less embarrassing activities category, I unexpectedly discovered something pretty cool lurking under the plating (such as it is) on the Royal’s lever arm.
From a caterpillar…
That unassuming lever arm is actually a beautifully sculpted chunk of solid brass. After a few moments of “oh crap, this looks nothing like it’s supposed to, what am I gonna do?”, I decided to polish it up and see how it came out.
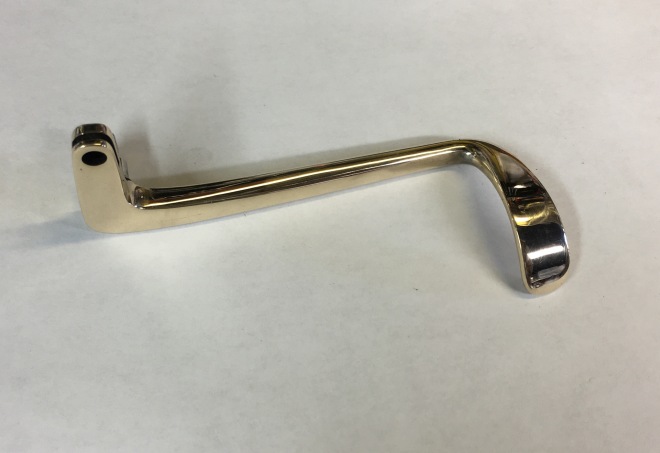
… to a beautiful butterfly!
Very nicely indeed. Took easily twice as much sanding as the steel parts but it’s looking goooood. That handle is going to stand out and class up this baby even more.
So far I haven’t found any more brass in this typewriter except for one spot: the little tubey things holding one set of rollers. Nowhere else. It’s odd and totally random. Why there? Wear resistance? And if so, why not anywhere else?
Brass tubey things. Yes, I polished them too.
It is a mystery that may never be solved. Partially because the designer of the Royal #10 took the secret to his grave a long time ago, and partially because nobody really cares.
Me, I’m just happy that one thing on this damn typewriter surprised me in a good way.
Now it’s time for a nap, then if we all behave, Show and Tell!
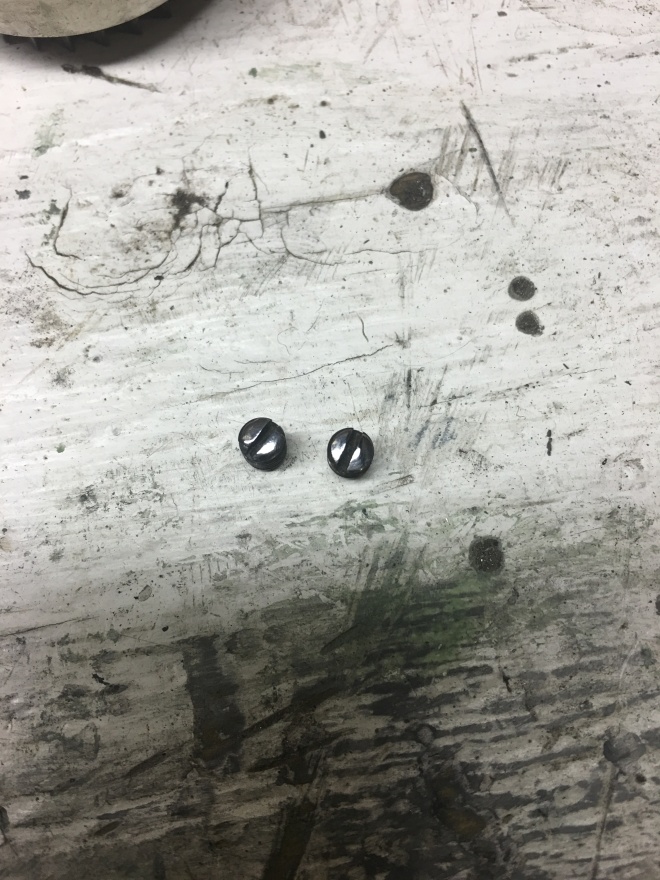
Yes, even the microscopic set screws get refinished and polished individually. They wouldn’t look right otherwise.
This isn’t normal. I get that.
Meanwhile, work continues apace. I’m reconstructing the carriage as I finish each piece; not exactly in the recommended order, but very helpful for remembering where everything goes. Almost down to the main carriage rails so at that point I’ll be nearly ready to reattach it back to the typewriter’s body and stick stuff on piecemeal until it’s all done.
Sneak preview of the carriage. Making good progress the past few days. This poor Royal has no idea how lucky it is. Not bad for something that was thrown in for free as part of another deal, eh?
This right here is my happy place. Carriage side bracket, before and after refinishing. Maybe not 100% flawless, but find me another century-old typewriter this clean and I’ll eat it.
Actually I’ll probably just beg the owner to spill their techniques.
Being a perfectionist sucks. Lately it sucks because this long-neglected 1916 Royal #10 is capable of being perfect again. I’ve already gotten the innards and mechanisms repaired, adjusted, tweaked and balanced so they’re humming along wonderfully. It types like a dream. The tragic mess of a repaint job has been painstakingly scrubbed off, exposing the original paint, logos and pinstripes trapped beneath. Said original paint has been laboriously buffed out to a glorious mirror finish. All well and good. Damn this thing is looking sharp.
Why would you do this to a typewriter?Let alone one that looked like this. HELL YES!Take that, probably long-dead typewriter repainter!
Except there’s just one problem. Now that the paint is all snazzy, it’s apparent the nickel-plated parts ain’t gonna fly in the condition they’re in. I saved them for last in the hopes that a gentle bath in rust remover and maybe some wire-brushing would be enough to get them back in fighting shape.
Nope. Just nope. Hilariously sad levels of nope. Various tests of different chemicals and techniques only served to prove the obvious: Pretty much all of the plating is totally ruined. I would say “all” but there may be a fragment of shiny nickel under the grime somewhere still.
Sad trombone.
This is where the perfectionist thing starts to suck. I can’t just leave it like that! Not on an otherwise pristine machine. There’s only one option left, and that’s the full bonkers nuclear option. The one that will take more time than the rest of this typewriter combined. The “if I charged by the hour, you could get three shiny screws or just go buy a whole new typewriter” option.
Yeah, as you can tell by the picture, I went there. Every single plated piece is getting removed and refinished one by one. Even the individual tiny screws because they would look stupid otherwise. Anyway. The ruined plating gets sanded off, followed by slowly working the scratched ugly bare metal up to a brilliant mirror shine. Half a dozen grits of sandpaper, mostly by hand because the Dremel can’t get into the curves, and then buffing on a polishing wheel, and then redoing hazy spots until it’s right.
Final step is dunking it in a bath of rust protectant and applying a healthy coat of wax, because otherwise the naked metal would start rusting again within days.
No sane person would ever attempt this. You don’t need to tell me that. But the completed pieces look so nice! And when I finish (a month or two from now at the soonest), and then painstakingly reassemble the typewriter from its hundreds of tiny pieces, and *then* adjust and tweak and balance it all over again, this will be the finest looking Royal #10 on Earth.
That creepy pyramid with an eyeball on the back of an American dollar bill
A startled amphibian
The Church of Our Lady Before Tyn in Prague (Google it, it’s beautiful)
A fruit bat wearing one of those novelty arrow-through-head joke things
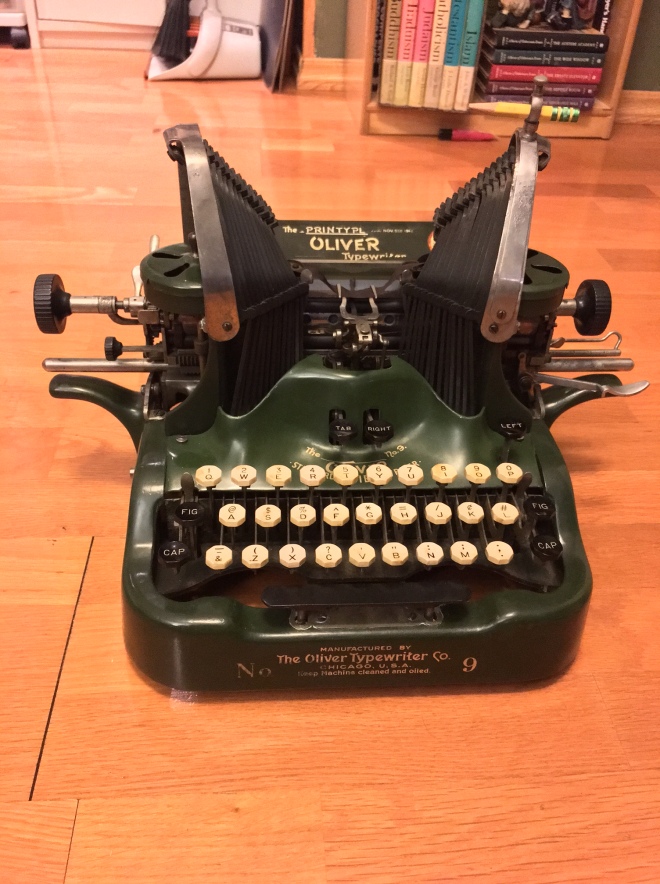
If you answered “Things an Oliver #9 resembles more than it does a normal typewriter”, you win. Pour yourself a stiff drink.
you see it, right?
In the art world there’s a school known as Outsider Art, where people have created paintings and writings and artworks completely without any training or even knowledge of the artistic norms we’ve been unconsciously absorbing our entire lives. As a result they tend to be strange, inaccessible, alien creations that follow their own set of rules which would never even occur to the rest of us.
Olivers are kind of the Outsider Art of the typewriter world. You end up with a typed page just like any “normal” typewriter, sure, but the path to get there is totally different. The two machines are similar in the way a fruit bat and a helicopter are similar, because they’re both capable of flight.
It’s quite clear that whoever designed the Oliver (that would be Reverend Thomas Oliver, by the way) had no more than the vaguest notion of typewriter technology when he built the first one. It’s full of all kinds of oddball solutions to typewriter-building problems of the day. Some are unexpectedly elegant strokes of genius, but others are baffling choices that are so objectively worse in every way than the techniques almost every other builder had adopted by then that you wonder what the hell Reverend Oliver was thinking.
Let’s start with the headscratchers. The main impression to someone actually trying to use an Oliver today is that typing on it is very slow. It’s a three-row double-shift mechanism, which is strange and inconvenient to all of us because it disappeared in favor of the much better 4-row single shift keyboards everyone uses nowadays. But even once you get used to that a fleet of less apparent but no less questionable choices soon make themselves known:
Backspacing is done by whacking an unmarked paddle hanging off the right side.
Setting or releasing the margins is a convoluted process which uses several randomly-placed buttons and a lever with an odd twist-and-slide movement.
Reversing the ribbon requires bonking an unmarked nub hidden on the side of the base.
Threading the ribbon is a hilarious process of threading the tiny wooden spools below, behind and through various openings while trying not to impale your fingers on the hooked razor sharp points of the vibrator.
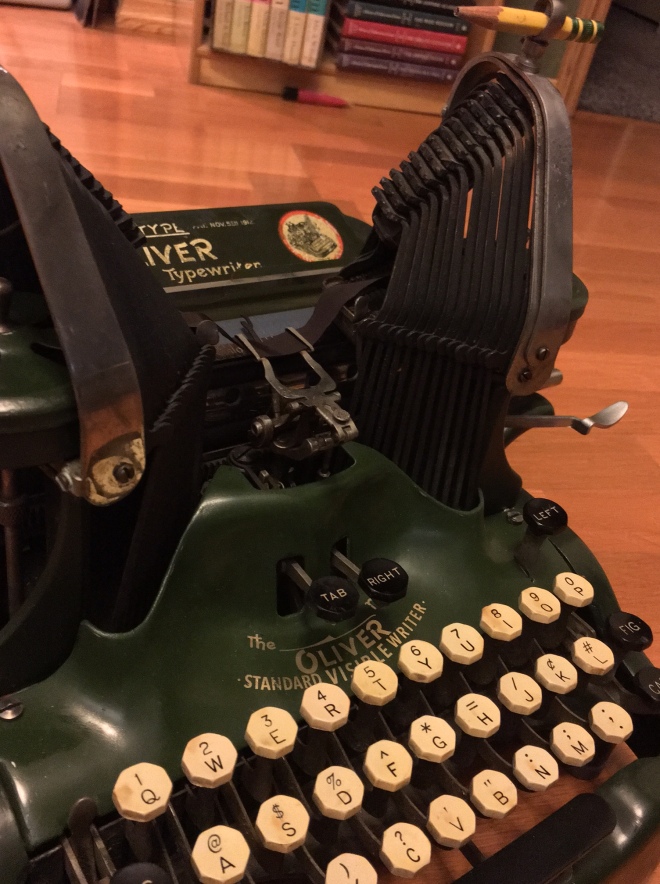
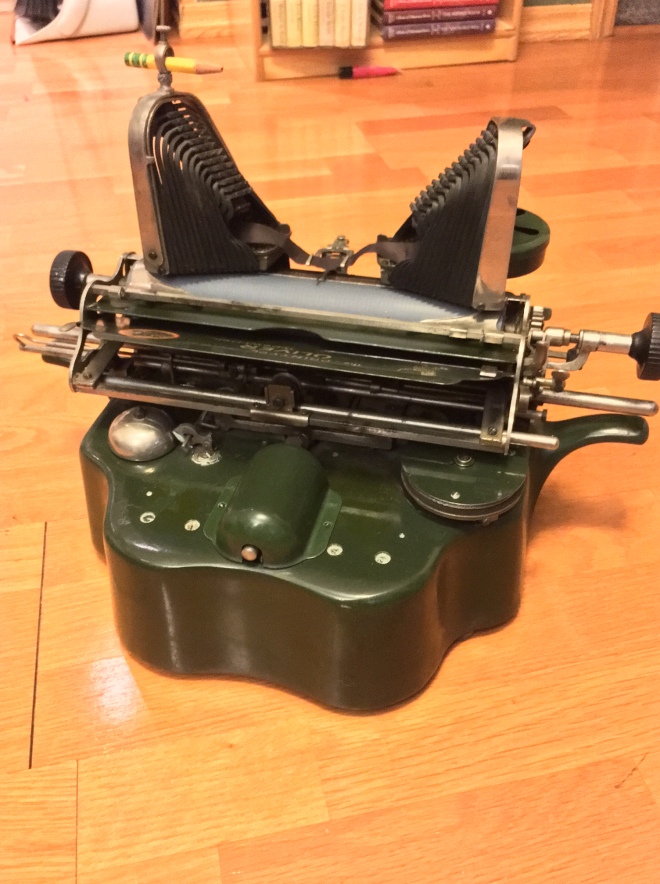
The plate above the keyboard is concave in such a way that every drop of moisture in the room will collect there and rust it into oblivion.
Right is left, left is right, Fig is Fig. The murderous ribbon vibrator surveys its domain.
It’s not all bad news though! The Oliver has a few unexpected strokes of sheer genius. First and best is the carriage: It can be completely removed and replaced with no tools in a matter of seconds. There’s a nifty little clip on the drawband which grabs onto the typewriter’s frame when you pop off the carriage, and hooks itself right back into place when you slide it back on. And in the event the clip fails or gets knocked off, a little pigtail-shaped wire will trap it and prevent it from ruining your day (and your face) when the spring tension releases all at once. Plus the cord can be replaced in five minutes by tying two knots in a string and dropping it right in. The entire carriage / drawband system is elegant, clean, and perfect.
Other good stuff:
There’s a retractable pencil holder for drawing lines on the paper.
The keys are octagonal and pop right off with a screwdriver for easy cleaning and maintenance.
The “Printype” font later #9s came with is pretty awesome.
There are GIANT PHALLIC HANDLES sticking out of the sides for easy portability.
In the early-1900s world of boring black rectangles, it stands out with its stylish green paint and voluptuously buttock-shaped rear end.
You’ll never be able to un-see that.
Oh, and I haven’t even mentioned the towers. That singular defining element of an Oliver typewriter. Those bizarre glorious towers. Two banks of U-shaped hammers hovering high over the paper, jaunty little spool holders nestled within each. In the 1890s world of non-visible typewriters, this was a revolution. You could see what you were typing! Only like three inches at a time, but still.
So the Oliver typewriter enjoyed its brief years in the sun, until by the early 1920s everyone else had caught up and surpassed it. Visible typing wasn’t a novelty anymore, and the Oliver’s wacky tower design meant that it couldn’t easily be improved upon by adding more keys or features. They ran out of money, sold the name to a British company who slapped it on normal-looking typewriters, and that was the end of that. No typewriters using the legendary original Oliver design have been made in just about a century.
Is that a bad thing? No, not really. It’s awkward to use even by typewriter standards, let alone the computers we’re all used to. There would be absolutely no market for such a thing in the 21st century, and what desire there is can be satisfied by the few relic machines still floating around out there, enduring testaments to ignoring conventional wisdom and solving problems in your own completely unique- and sometimes baffling – ways. The world is a better place for having Oliver typewriters in it, even though they haven’t been the solution to any problems whatsoever in the past eighty years.